

How to Recover Data from a Damaged RAID 5 Array on Intel Entry Storage System SS4000-E NAS


From this article, you will learn how to recover data from a damaged RAID 5 array on Intel Entry Storage System SS4000-E NAS. We will explore aspects of its initial configuration, learn how to create a RAID array, set up network access and add a shared folder.
These days, the issue of reliable file storage becomes particularly urgent. Over time, almost every PC user – even if that’s a proverbial ordinary home user without regular access to local or global networks – comes to accumulate gigabytes of information – photos, videos, documents and other stuff. The risk of losing everything in one second and forever only because your hard disk breaks down is quite high.
Yes, modern motherboards let users create fault-tolerant software RAIDs, but there are also considerable reasons to choose a specialized solution in the form of a NAS device, as disk arrays in such devices are built on a hardware level.
Also, increasing the number and volume of hard disks in an individual computer can hardly be seen as a good solution, as it pushes up the noise level and requires better power supply and cooling options.
A dedicated NAS storage will ensure the safety of your data and access to it over the network. The RAID technology is quite a reliable way to store important information, but there are certain factors which cannot be ignored with any kind of technology available these days. Just like any other device, NAS is not perfect and may break down after many years in service. As a result, you will lose access to your files stored there.
How to configure the storage
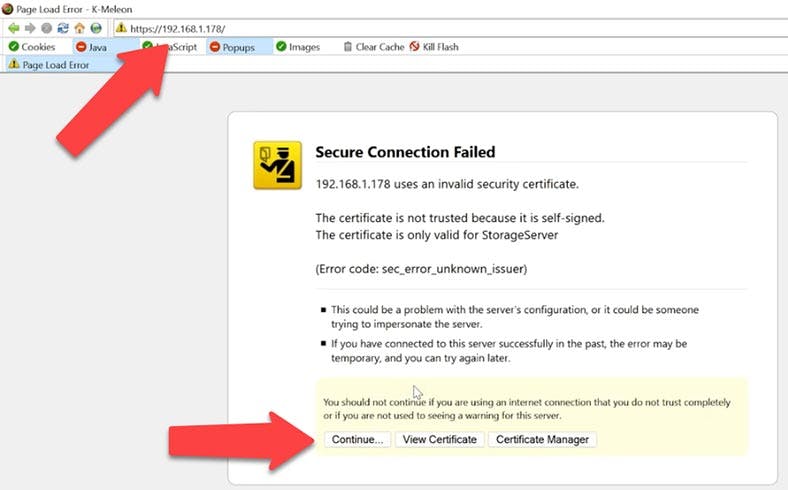
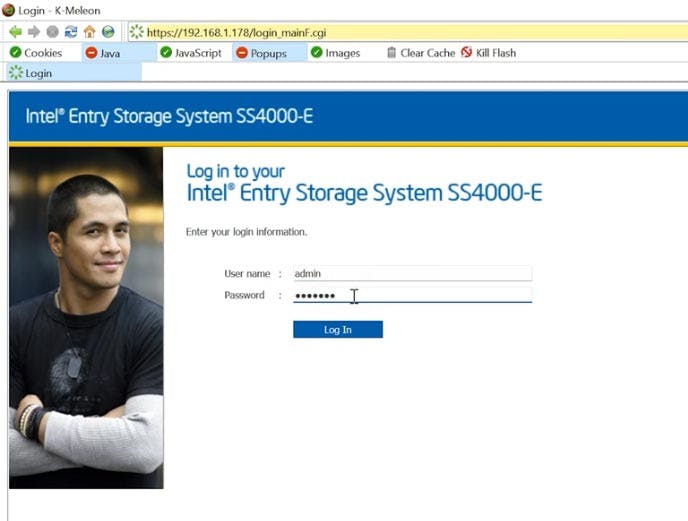
For starters, let’s explore initial configuration of a network-attached storage system. Open a browser and type the server’s IP address. Give the default login – admin – and password – storage.
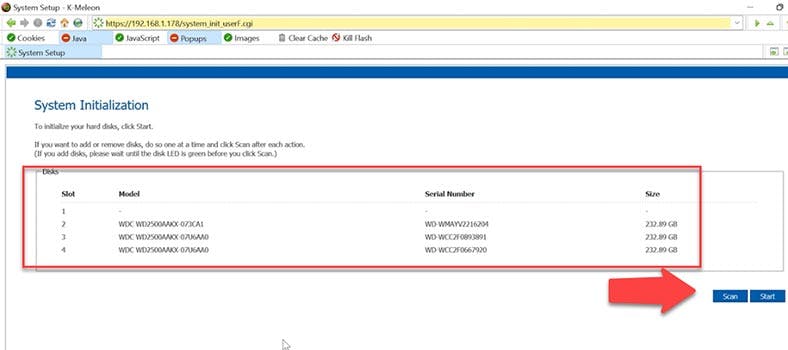
After sign-in, you’ll see the disk initialization screen. If you don’t see the connected disks on this list, slick Scan, and then Start to begin the configuration process. Certain information will be written, and the disks will be partitioned; after that, the NAS will reboot, so let’s wait until it is ready for work again.
Soon you will see the welcome screen. Click Next to continue with the configuration. Accept the license agreement – Next.
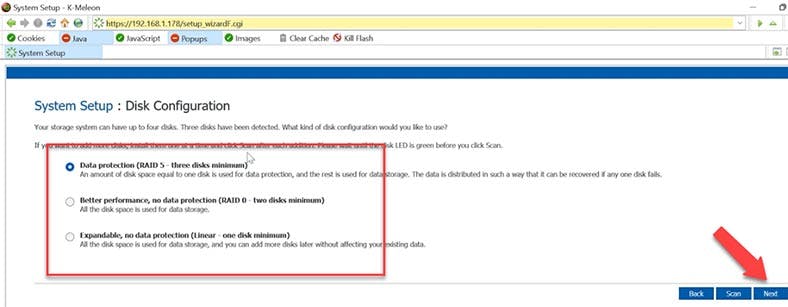
At the first stage, you need to give a name to your storage system, and set up date and time, choose network settings, and the disk array type. This device lets you create one of the three RAID types – 5, 0 or 1. What we need is RAID 5.
In the disk space settings, give the disk size and click Finish, then OK to confirm your choice. You can only change these disk configuration settings at the cost of data loss. Also, you will lose common folder, user and group properties. In theory, the last option of disk configuration lets you add more disks later without losing data, but it doesn’t offer you any reliability.
Wait until the system is configured, and when it happens, the device will reboot automatically.
Give the default login – admin – and password – storage.
It will open the storage management page; this is where you can create a new user or a group, shared folders, and also access administration features.
How to configure FTP acess
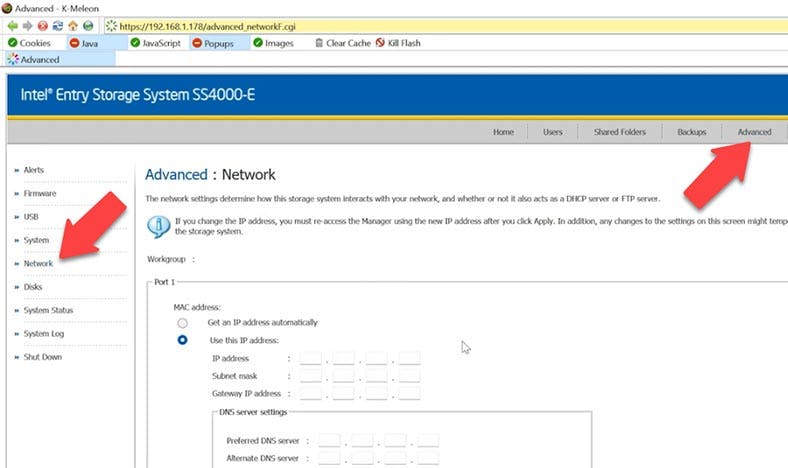
For starters, let’s configure network access to the storage via the FTP protocol. To do it, open the menu tab Advanced and browse to Network. At the bottom of the screen, enable FTP server and click Apply to save the settings.
How to create a new user
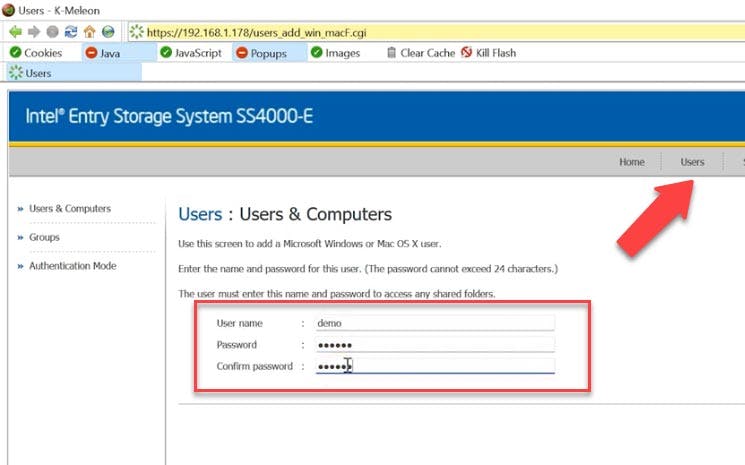
Now let’s create a user that will have access to a shared folder by FTP.
Open the tab Users and click Add to create a new one. Specify the connection type, the login and the password.
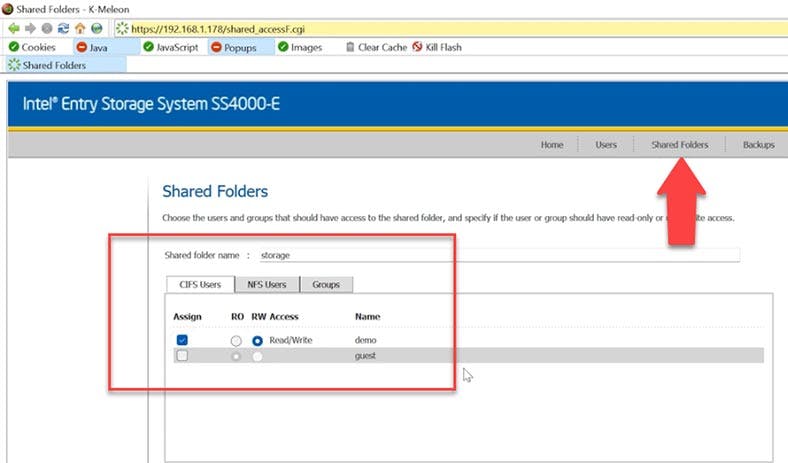
How to create a shared folder Now let’s create a new shared folder. Open the tab Shared Folders. Click Add, give a name, select a user that will be provided network access, set read / write permissions, and click Apply to save the changes – and finally, click ОK.
Later, you’ll be able to connect to your NAS by FTP and upload your files. The configuration and current state of the disk system are displayed if you navigate to the tab Advanced – and click on Disks. At the moment, resynchronization process is underway – the disk space is being created. By pressing this button you can edit the configuration by changing the RAID type and volume size.
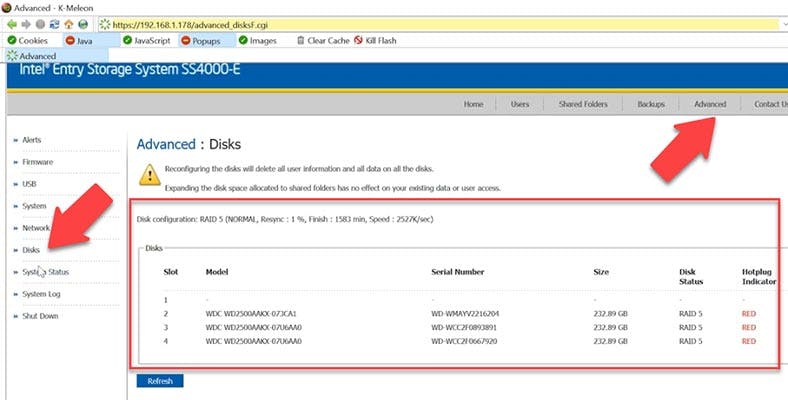
But as I said before, you can’t possibly make any changes to the RAID type without losing data.
How to recover data from a non-working Intel Entry Storage System SS4000-E NAS
If your NAS is down, or one or several disks in the array are no longer functional, and as a result of that you have lost access to some data which still remains on its disks – a specialized data recovery tool – Hetman RAID Recovery – will help you bring your files back.
This program supports all popular RAID types and most file systems. It can also help you rebuild a damaged RAID, even if one or several disks within the array are out of order. You’ll be able to restore critical information, which is still on the disks, and do it without actually using the NAS.
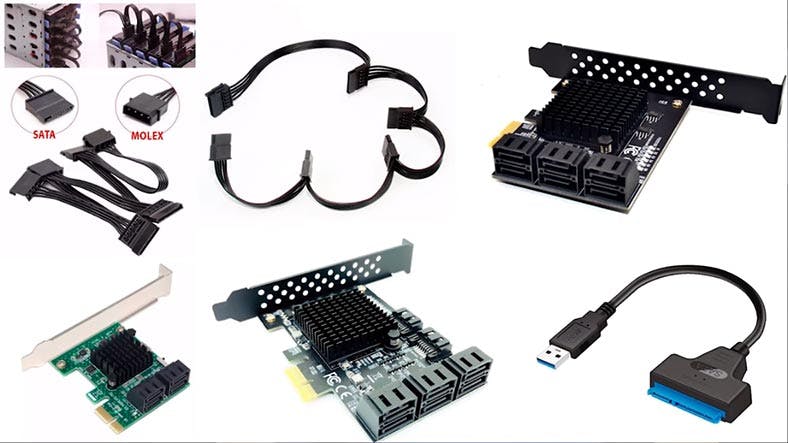
Take the disks out of the network storage and connect them to the motherboard of a Windows computer. If your motherboard lacks SATA ports to connect all the disks, or you have a similar problem involving power connectors, you can solve the problem by using special expansion cards and adapters.
With this type of device, RAID arrays are based on IPStorPartition technology, and many recovery tools don’t support it. Meanwhile, Hetman RAID Recovery can properly handle arrays with this technology.
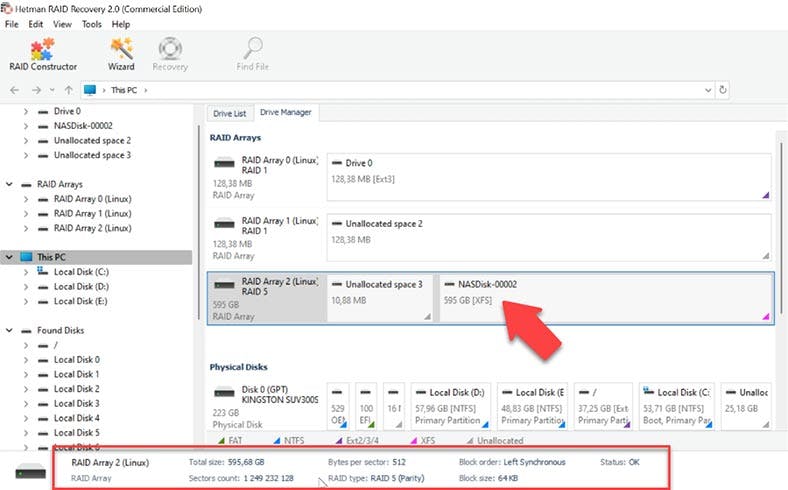
As you can see, the program has built the RAID system automatically and now displays all the information about the array. To search for files, right-click on the disk and select Open. Choose the search type, Fast scan or Full analysis. For starters, we recommend Fast scan – the utility will promptly analyze the disk and display all the detected files.
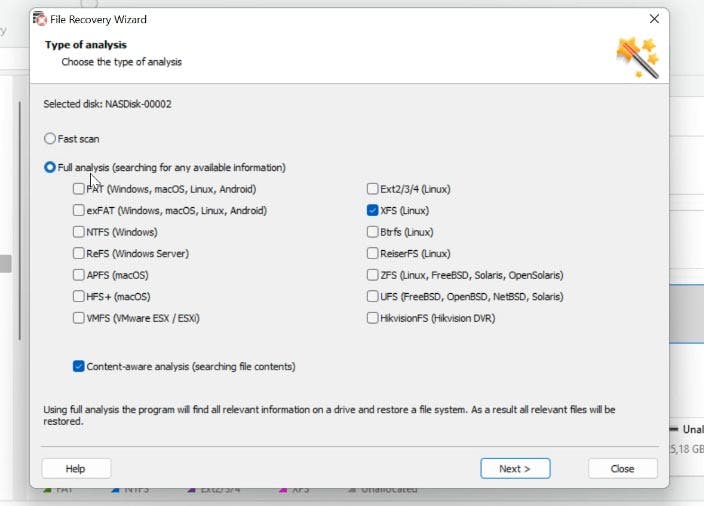
If the “Fast scan” can’t find the required files, then go for “Full analysis,” select the file system and click Next. In most complicated cases, we recommend searching files by their signatures, by checking the box next to Content-Aware analysis.
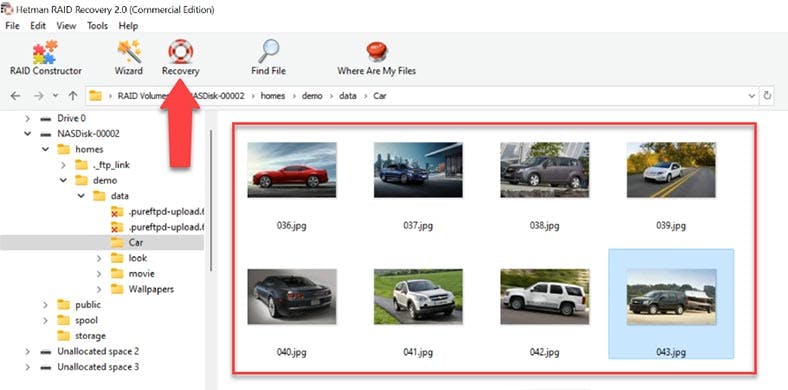
The program has found all the files stored on this array. For your convenience, there is an option to search for files by their names. Also, you can check file contents with the preview option. Removed files are marked with a red cross. Look for the ones you need to restore, select them and click Recovery. Choose the folder where you’d like to save the files and click Recovery again.
When the process is over, you will find all the data in the folder you have chosen.
How to build a RAID manually
In very complicated cases, when critical service data was erased from the disks, the program may fail to rebuild the RAID automatically. Luckily, for such cases this program features a manual way for rebuilding the RAID in a special constructor mode. To use this mode, you need to know all the information about the damaged array.
Open RAID Constructor, select Manual mode, click Next and fill in the array data. RAID type, block order, block size, add the disks included into the array and specify their order. As a result, it should appear in this window; if you got all the properties right, you will see the directory tree If you see none, it means the properties are incorrect, or this information is insufficient to identify the RAID. You may have to specify the offset which tells you where the beginning of the disk is located. You can find this information with the help of HEX Editor.
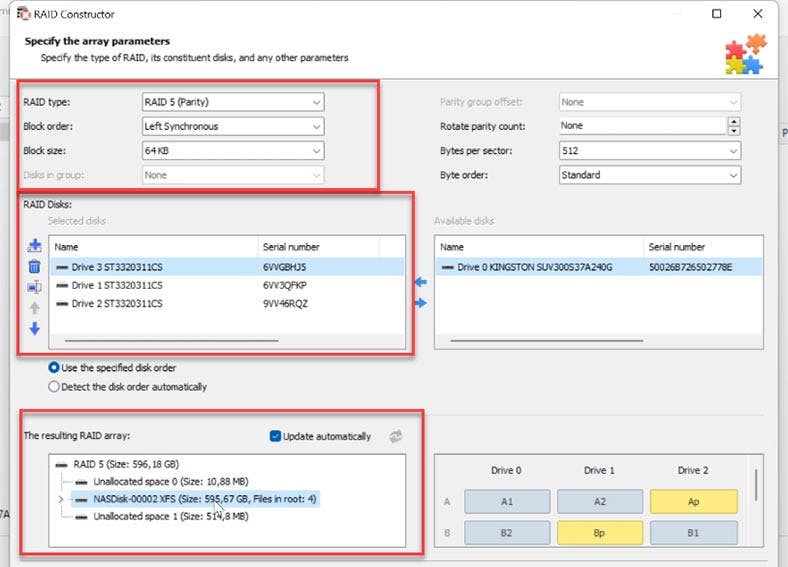
When all the properties are ready, click Add. After that, the array will appear in the Drive Manager. Now the last step is to scan it using Fast scan or Full analysis, and recover the files you need to restore.